Well, you want to keep the reader’s attention and don’t want to make the same mistake. Right! No more worries; we are here to help you with an ultimate and quick guide on the featured image.
Choosing the right featured image size is vital for creating a professional and visually appealing WordPress website. WordPress featured images are the first visual impression visitors get of blog posts, archives, and social media previews. However, the variety of themes, plugins, and devices can make it challenging to select and manage the optimal image dimensions. This ultimate guide simplifies the process by explaining recommended sizes, how WordPress handles image resizing, customizing featured image sizes, and tips to optimize your images for speed and quality. Whether you’re a beginner or seasoned WordPress user, understanding featured image sizes will help elevate your site’s design and performance.
Read on here; you will get all you need to know.
WordPress Featured Image:
Before getting into further details, let’s find out what a WordPress-featured image is.
- So, the featured image is just an image that will become a thumbnail. So it means whenever someone opens up your blog, the picture that appears at the top is a featured image. Whereas most of the themes would be done by the theme itself, sometimes you have to do it manually.
Most importantly, a featured image is where the user will decide what to do next, whether he need to read it further or not. As here, he will build up a perception about the article, and it doesn’t matter how good your remaining article is. You can’t beat his mind.
And writing a great piece of content wouldn’t be worth it if you don’t have an engaging and eye-catching image. So, let’s find out what an ideal WordPress featured image size is and how you can also have it.
Let’s get into it.
What is WordPress’s featured image size?
The ideal featured image size for WordPress is generally 1200 x 628 pixels. This size is widely recommended as it provides a good balance between high resolution for display on various devices and platforms, including social media sharing, and a manageable file size for optimal loading speed.
So, let’s find out how to change the size and customize it according to your needs.
Key considerations for WordPress featured image sizes:
Theme Compatibility:
While 1200 x 628 pixels is a common recommendation, it is crucial to consult your specific WordPress theme’s documentation for its recommended featured image dimensions. Different themes may utilize different aspect ratios or display areas for featured images, potentially leading to cropping or scaling issues if not adhered to.
Social Media Sharing:
The 1200 x 628 pixel dimension is also well-suited for social media platforms like Facebook and LinkedIn, ensuring your featured image displays correctly when shared without awkward cropping.
Responsiveness:
Utilize a responsive WordPress theme to ensure that your featured images automatically adjust and display correctly across various screen sizes, including mobile devices.
File Size Optimization:
Aim to keep the file size of your featured images below 500 KB (or a maximum of 1 MB for prominent displays) to ensure fast loading times, which positively impacts user experience and search engine optimization.
Customization:
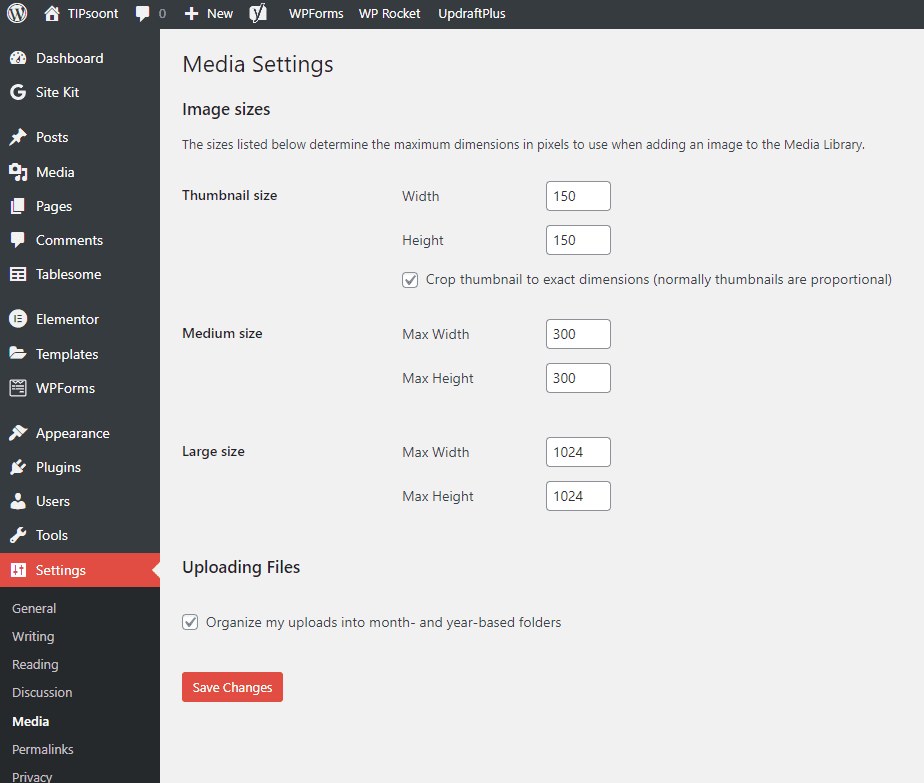
WordPress allows for customization of default image sizes through Settings > Media in your dashboard. You can also utilize plugins to create and manage custom image sizes for specific needs.
Aspect Ratio:
Maintaining a 16:9 aspect ratio is generally recommended for featured images as it is widely compatible across devices and platforms, minimizing the risk of unwanted cropping.
High-Resolution Displays:
For optimal display on high-resolution screens (e.g., Retina displays), consider using a larger size like 1600 x 900 pixels, ensuring sharpness and clarity. However, balance this with file size considerations.
Key aspects of featured images:
Importance:
Featured images are vital for creating a strong first impression, attracting clicks, and ensuring your content looks professional and engaging across different platforms.
Visual Representation:
They act as a “cover image” for your content, providing a visual summary before a user reads the full article.
Display Locations:
Featured images appear in various places, including:
At the top of individual posts or pages (depending on the theme).
As thumbnails in post archives, category listings, and search results.
In recent post widgets or related post sections.
As the default image when content is shared on social media platforms.
How to Change WordPress Featured Image Size?
Giving a proper size to the featured image will save you from cropping issues as you will create your next thumbnail under an adequate limit. At the same time, cropping is an issue, whereas WordPress will automatically cut the excessive image, exceeding its default size.
As you have no restrictions on it, you can change this size according to your choice and the demand of a blog or website. And to get it done, all you need to do is
- Log in to your WordPress dashboard
- Just go to settings and then media
- Here you can pick up the best of your WordPress featured image size with a dedicated dimension and width.
As In the Following Image
That’s it!
Note: these settings would work only for the new featured images of your blog, and if you want to change the size of previous ones, you need to do it manually, but if you don’t want to make much effort manually, don’t worry bundle of plugins is always there to help you out.
How to Set WordPress Featured Image?
If you are a beginner, you may have this concern, so let’s explore how to quickly set up a WordPress featured image.
- To set a featured image, paste your article.
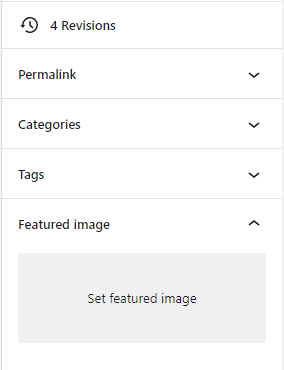
- Scroll down to the right side, and here on the right side, you will find an option for a featured image right under the categories and tags option.
- Simply click on it, and you will find both options to add an image: either through the media library or by uploading from your computer – it’s entirely up to you.
- Next, add Alt text and other options, like in other images.
- That’s it now. Click done as it’s done now.
Well, it doesn’t mean you can’t change it if it is just selected or has settled up a featured image. You can still change or edit it whenever you want.
Key Points on Changing Settings > Media and Existing Featured Images:
Theme-Specific Image Sizes
Remember that themes can register their own image sizes separate from WordPress’ default media sizes. Changing Settings > Media doesn’t affect theme-specific sizes unless you adjust those in your theme’s functions.php and regenerate thumbnails.
New Uploads Use New Sizes:
When you change the thumbnail, medium, or large image dimensions in Settings > Media, any newly uploaded images will have size versions created with those updated dimensions.
Existing Images Retain Old Sizes:
Images uploaded before the change keep their previous size versions. WordPress does not retroactively resize or regenerate images already stored.
Thumbnails May Appear Different:
If your theme or plugin uses default WordPress sizes for featured images, you may notice that previously uploaded featured images appear differently (too large or small) compared to new uploads due to different size versions being used.
Regenerate Thumbnails Plugin to Fix This:
To apply your new Media settings to existing images (including featured images), you need to use a plugin like Regenerate Thumbnails or Force Regenerate Thumbnails. These plugins recreate all image size versions according to your current settings.
No Impact on Original Image Files:
Changing Media settings and regenerating thumbnails only affects resized versions, not the original uploaded image files in your Media Library.
Well, optimizing a featured image is not only for web pages, as the proper sizing matters in social media, too. Let’s say somebody is sharing your content on other social media platforms just like Facebook, and will it leave a good impression if it doesn’t have an appropriately sized thumbnail? No, it doesn’t, and of course, you understand the importance; that’s why you are here.
So, you do not need to worry, as the extensive database of plugins on WordPress is always there to help you out.
- All you need to do is install any Yoast plugin and then activate it
- That’s it! Start optimizing your blog site.
- Here you will find many options – you can also preview how it will look when someone shares your blog on any social media platform.
Best practices for featured images
- Use a consistent style: Maintaining a consistent visual style for your featured images can help build brand recognition over time.
- Optimize for SEO: Add descriptive alt text and titles, and compress the image file size for faster page load times. This can improve your content’s performance in search results.
- Choose the right size: While themes can automatically resize images, a good starting point is around 1200 x 628 pixels, which is ideal for social media sharing previews.
- Use relevant visuals: Ensure the image accurately represents the content of your post. Eye-catching and relevant visuals can significantly increase engagement.
- Find high-quality, free images: To avoid copyright issues, use CC0-licensed images from stock photo sites like Pexels and Unsplash, or from the WordPress photo directory.
How to troubleshoot featured image issues
Image not showing up: This can be caused by a plugin conflict, a theme that doesn’t support featured images, or incorrect dashboard settings. Try updating plugins, checking your theme’s documentation, or re-enabling the “Featured image” option in your “Screen Options” menu.
Image appearing twice: If you insert the same image into both the featured image panel and the post’s content, it can appear twice. Simply remove the image from the content area and use only the featured image panel.
Incorrect social media thumbnail: If Facebook or other social media sites show the wrong image, use a dedicated SEO plugin like AIOSEO. Its social features allow you to specify exactly which featured image should be used for social shares.
Bonus Tips for WordPress Featured Image:
Though we have had enough discussion on WordPress featured image sizes, wait! This isn’t it. Per our promise, we have some bonus tips for you that will ultimately help you get the best things done.
- Whether you use customized or stock image choice is entirely yours, but all you need to benefit from is the perfect sizing, color schemes, and quality of images – your entire focus should be on these 3 things.
- Most blogs use Unsplash, Pixabay, or Shutterstock images that are not worth it, and to beat your competitor, using unique ideas will help you stand out from the crowd.
- Create a color palette for your brand and stick it to it. It will also help you save time as you don’t have to think about the colors again and again for future designs. With that, you can create a brand identity for your blog.
- While saving your featured image, you need to make the correct file name, as it’s just like a backup of your image’s data. Once you are creating, you won’t notice or wouldn’t consider it essential, but it is. Just think of the photos you saved as a JPG or PNG.1 Name how you would find such images for future use. So, giving unique names, including keywords, won’t only create ease but also be a good SEO practice.
- Well, you don’t need to stick to the images only. You can consider graphics or other options, too.
- Last but not least, don’t forget to give the image an Alt text, as it will be helpful for both the user and Google to understand what the image is about clearly.
Use AI to generate a featured image
You can generate a featured image with AI that’s based on your page or post content.
To generate a featured image for a post or page with AI, follow these steps:
- While editing a page or post, open the page settings sidebar.
- Click on the “Set featured image” box, which will appear if an image is not already present.
- If a featured image is already present, click the “Remove” button first.
- Click the “Generate with AI” option, which will use AI to create a new image based on the post/page content.
Click the “Publish” or “Save” button to apply your changes.
If you don’t like the first image, you can use the text box to describe the image you’d like to create and click the Generate button.
You can repeat this process as many times as you like, and you can browse the previously generated images using the arrows below the image. All AI-generated images are automatically added to your website’s Media Library.
With your desired featured image selected, click the “Set as featured image” button.
Replace or remove a featured image
To change or remove a featured image on a page or post, follow these steps:
- While editing a page or post, open the page settings sidebar.
- The featured image section will show your featured image with buttons to replace or remove the featured image.
- To replace a featured image, click the Replace button, then select a new image from your media library or the other available options.
- To completely remove the featured image from the page or post (but not from your Media Library), click the Remove button.
- Click the “Publish” or “Save” button to apply your changes.
Hide a featured image
You may want to keep your featured image so that it appears in social previews and search results, but you don’t want it to appear on your actual page or post.
If you are using a block theme, you can remove the Featured Image block from the page template or post template.
Classic or third-party themes may have other options for hiding the featured image from your content. Check your theme’s documentation for more information.
Where featured images appear
Featured images are used in many ways by themes. Here are some examples of places where featured images may appear, depending on your theme:
- Search results
- Blog Page
- Portfolio Page
- Featured Content on the homepage:
If a featured image does not appear as expected, check your theme settings to ensure the theme is set up to display featured images. The setup can vary depending on the type of theme your site uses:
- Block Themes: Use the Featured Image block in your template.
- Universal, Hybrid, and Classic Themes: Check the Customizer for “ Options” or a similar section. Your theme may have a setting here to show or hide the featured image in certain areas.
- Third-Party Themes: Check your theme documentation for details.
If your featured image is the wrong size, please refer to your theme’s documentation for recommended dimensions to use. Certain themes use featured images in ways that may require a specifically sized image to work correctly. Visit our Optimize Your Images guide for more.
Most WordPress themes typically do not display captions with featured images, but you may be able to display captions with a featured image caption plugin.
Social media sites like Facebook will often use the page’s featured image when you share it on social media. Here are examples from Facebook and LinkedIn:
Facebook
Final thoughts:
Mastering WordPress featured image sizes empowers website owners to enhance visual storytelling, improve loading times, and ensure images look great across all devices and platforms.
By choosing recommended sizes, customizing theme settings, and optimizing your images, you can create a consistent, engaging user experience.
Remember to regularly check how your images appear on desktop and mobile, and use plugins or custom code to adjust sizes as needed.
This ultimate guide provides the foundation for managing featured images with confidence, supporting a stronger, more professional online presence.
Ignoring WordPress image sizes is like creating a mess, as longer images will lead to bigger file sizes that will cost you speed and waste time.
Would you like to make this mistake? Of course, no, you value the importance of adequately sized images. That’s why you were there.
So, all you need to do is be unique, be consistent, use high-quality images with a creative content plan/strategy, and be ready to rock the world.
I hope this guide has created some value for you. Do write in the comment section if you have left any unanswered queries. We would love to be there.
Till Next!
FAQs
1. What is the recommended size for WordPress featured images?
The most commonly recommended size for featured images is 1200 x 628 pixels, which fits well with social media sharing and most themes, but always check your theme’s specific requirements.
2. How does WordPress handle featured image sizes?
WordPress automatically generates multiple thumbnail sizes from your original upload: thumbnail, medium, large, and full size. Themes, then select the appropriate size for display.
3. Can I customize the featured image size in WordPress?
Yes, you can customize sizes by adding code to your theme’s functions.php file or using plugins to set custom dimensions for post thumbnails.
4. How can I ensure my featured images load quickly without losing quality?
Optimize images by compressing files using tools like TinyPNG or ShortPixel before uploading and choose modern formats like WebP for faster loading.
5. What should I do if my featured images appear blurry or stretched?
Check that the image size matches the theme’s display size, regenerate thumbnails if you’ve changed sizes, and avoid uploading images smaller than the required dimensions.
- Squarespace Template Change Guide for Versions 7.0 and 7.1 in 2025 - September 17, 2025
- Best WordPress Books, Custom CSS Tips & Elementor Free Guide (2025) - September 17, 2025
- How Long Learn WordPress? (Complete Guide 2025) - September 15, 2025






1 Comment