
The world of Website designing or development is evolving each day. One such enhancement is a shift from Containers to Columns in the WordPress technology. And if you also want to enhance your website design, how to do so.
If so, then don’t worry. We have your back with our step-by-step guide on how to convert from container to column in WordPress. All you need is to stick with us till the end.

Why Convert a Container to a Column in WordPress?
Transitioning from container to Column-based layouts in WordPress holds numerous benefits. All help enhance user experience, bring charm, and make a site responsive.
A few of the reasons why you should also convert a container to a column are as follows.
- Modern Feel: Nowadays, column layouts are a popular design trend in web design. That’s why converting to columns can give your website a more modern and up-to-date look and feel.
- Media Display: Strategic use of media within columns can act as visual cues for the users. It can further enhance navigation by directing users’ attention to specific sections or calls to action.
- Responsive: Many column layouts are responsive. It means they can adapt and adjust the design according to different screen sizes. This will also ensure your website looks good and functions well on desktops, tablets, and mobile devices. So, doesn’t matter how users access and interact with your site; the design will stay responsive.
- Navigational Ease: Another benefit of shifting to column-based layouts in WordPress is the ultimate navigational ease. It’s because well-placed media can create a website that is both easy to navigate and visually appealing. This keeps users engaged and helps them find the information they need more easily.
- Enhanced Visual Appeal: Column layouts can create a more visually interesting and engaging website compared to a single-column container. You can arrange different types of content, like text, images, and videos, side-by-side to create a dynamic layout.
- Flexibility: Columns offer more flexibility in how you present your content. You can adjust the width of each column, use different numbers of columns for various sections, and even nest columns within columns for complex layouts.
Difference Between a Container and Column in WordPress:
Containers and Columns both play their distinct roles in shaping the layout of your website or web pages.
For instance, a Container can act as a flexible box that holds your content. You can use it to define the overall width of your website or create specific sections for different purposes, like a call-to-action area. However, containers offer limited customization beyond the width and basic styling.
Columns, on the other hand, take things a step further. They act like dividers within a container, splitting its space into vertical sections. This allows you to organize your content side-by-side. So, Columns are perfect for breaking down large chunks of text and creating visually interesting layouts with a mix of media. Here, under columns, you can also adjust the number of columns, their width, and the spacing between them to achieve the perfect layout for your content.
How to Convert a Container to a Column in WordPress?
Knowing the difference between a container and a column and why you should do so will make you wonder how to convert a Container to a Column in WordPress.
Important Note: Before we dig in you must know not all WordPress themes offer built-in column functionalities. That’s why, depending on the theme you’ve been using, you might need to switch to a theme or install a page builder plugin that supports columns. Some popular options include Gutenberg (the default WordPress block editor), Elementor, Beaver Builder, etc.
Step 1: Backup your website
Backing up your WordPress website before making any changes is always recommended to avoid foreseen consequences.
Suppose something unexpected happened during changes, and you lost your access to the website. In that case, you will still have the backup to recover the data.
For this purpose, you can either use a plugin like UpdraftPlus to schedule automated backups for your site. Conversely, if you are a technical person, then you can also do it manually hiring a professional web designer is always a good choice.
Step 2: Select the container
Before diving into columns, you need to identify the container you want to convert. For instance, your webpage is a canvas, and containers are like designated areas where you place specific content. Here, it would help if you looked for the section currently holding your content in a single block.
This could be the entire width of your webpage or a designated section for a specific purpose. So, select the desired container you want to convert and move to the next step.
Step 3: Access block settings
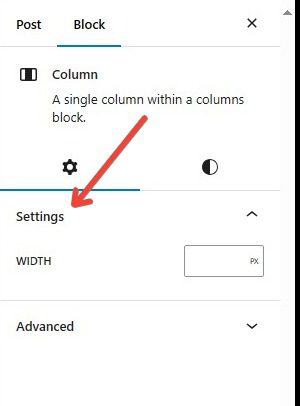
Once you’ve identified the container, it’s time to access its settings. Most WordPress editors, including Gutenberg (the default block editor), allow you to edit individual sections. Click on the container to select it. This will usually reveal a block settings panel or menu.
Step 4: Select column options and adjust settings
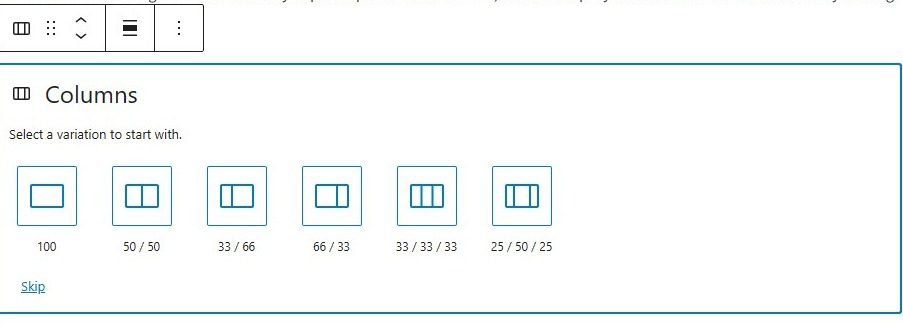
Within the block settings panel, you will find an option dedicated to columns. This might be labelled “Columns,” “Layout,” or something similar. Just click on this option, and it will reveal the magic, i.e. different column layouts to choose from.
Step 5: Insert the content
Once you select the desired style of your column, it’s time to populate them with your content. All you need is to drag and drop existing content blocks from within the container or add new ones directly into each column.
Whether you add text, images, or videos – the possibilities are endless! Experiment with different content arrangements within each column to achieve the desired visual flow.
Step 6: Preview the post or page
Before hitting publish, it’s always wise to preview your work. This allows you to see how your newly designed column layout appears on different screen sizes. So, preview that page and make any final adjustments (if needed) to ensure your content displays perfectly across all devices.
Step 7: You are all done
That’s it; once you’re satisfied with the layout and content organization, it’s time to publish your changes! You’ve successfully transformed your container layout into a more structured and visually engaging column layout.
FAQ:
Not all themes come with column options. If yours doesn’t, you can install a free page builder plugin like Gutenberg Blocks, Elementor, or Beaver Builder. These plugins offer various column layouts and customization options.
Yes, most editors allow you to adjust the spacing between columns. Look for options like “Column Gap” or “Spacing” within the column settings panel.
Your existing content within the container will usually remain intact. You can then drag and drop it into the newly created columns or arrange it as needed.
Most column layouts are responsive by design. However, it’s always a good practice to preview your page on various screen sizes (desktop, tablet, mobile) to ensure everything displays correctly. Your chosen theme or page builder plugin offers additional responsive layout settings.
I am Sure You'll learn Alot..
- Can I Use Amazon Product Images on My Affiliate Website - July 1, 2024
- How to Change Page Title in WordPress With Just a Few Clicks - June 27, 2024
- WordPress Changes Not Showing? (Here is How to Fix) - June 13, 2024


