

Learn how to add custom fonts in Elementor Free using a plugin in just 3 simple steps. Improve design, branding & site speed with our 2025 updated guide.
Customized fonts could be an exquisite way to stand out from the crowd. It will help you build your brand awareness and help your audience distinguish you from others. But what if you have the same fonts available all around? No more worries, as Elementor is here to help you out. But what if you need a pro version of Elementor and are wondering how to add custom fonts in Elementor for free?
Introduction
Typography plays a crucial role in web design, influencing not only how your content looks but also how users interact with your website. Elementor Free offers a wide range of fonts, but what if you want to use a custom font that matches your brand identity? The good news is—you don’t need Elementor Pro for that. In this guide, you’ll learn how to add custom fonts in Elementor Free using a plugin with a simple, step-by-step process.
Here we have a detailed step-by-step guide on how to add customized fonts in Elementor for free. All you need to do is stick with us till the end. So, let’s find out together.
Can You Add Custom Fonts in Elementor for Free?
WordPress has over 800+ built-in fonts, but they are all the same, which anybody can use. These WordPress fonts could be more helpful when you are looking to create your unique brand look. Don’t worry; Elementor has your back. The main reason for the likeliness of Elementor is the customizations and open environments for the users. You can edit your site completely and even change the custom colour for links, etc It doesn’t matter whether you have a paid or free version; you can add custom fonts in WordPress using Elementor. This will help you to grab the ultimate benefits of different fonts, styles, sizes, and variations in your WordPress site.
So, without further ado, let’s find out how to customize fonts in Elementor for free.
How to Add Custom Fonts in WordPress Elementor Free?
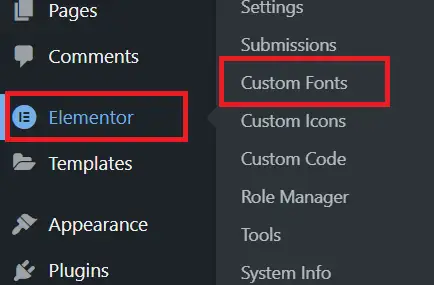
If you have a Pro version of Elementor, it will be much easier to add custom fonts in Elementor. But if you don’t have it, you can still do this with the help of a plugin.
Simply stating, if you are using a pro version of Elementor, you can achieve multiple functions, but if you don’t need to access every other pro feature, you must install a plugin. That’s why we recommend using the pro version. But if installing and using a plugin is something you are comfortable with, then you can do this.
Let’s find out which plugin you need and how to add custom fonts with its help.
(Step 1): Install and activate the plugin:
- Log in to Your WordPress Dashboard:
- Use your website’s admin URL (usually something like yoursite.com/wp-admin).
- Enter your username and password to access the backend.
- Navigate to the Plugins Section:
- On the left-hand sidebar, locate and click on Plugins.
- Then select Add New to open the plugin installation page.
- Search for the Custom Fonts Plugin:
- In the search bar on the right, type “Custom Fonts”.
- Look for a popular and trusted plugin like “Custom Fonts” by Brainstorm Force, or “Use Any Font,” which are widely used for uploading fonts locally.
- Install the Plugin:
- Once you find the plugin, click the blue Install Now button.
- WordPress will download and install the plugin files on your server.
- Activate the Plugin:
- After installation, the Install Now button changes to Activate.
- Click Activate to enable the plugin on your WordPress site.
- You will usually see a confirmation message that the plugin is activated.
- Plugin Configuration Page:
- After activation, most plugins will add a new menu item in your dashboard (for example, Appearance > Custom Fonts).
- You can now access the plugin’s settings and features to upload and manage your custom fonts.
- Check Compatibility:
- Ensure your WordPress, Elementor, and other essential plugins are updated to avoid conflicts.
- If there are issues installing from the dashboard, you can also download the plugin .zip file from the WordPress.org repository and upload it manually via the Upload Plugin button.
This step is essential to enable the feature of uploading and managing custom fonts locally so that you can use them later in Elementor, especially in the free version, where native custom font support is limited.

Adding custom fonts in WordPress with the help of Elementor is easy. With the use of this plugin, you could add custom fonts in Elementor Free in just 2 more quick steps.
(Step 2): Upload Your Custom Font
- After installing and activating the Custom Fonts plugin in WordPress, go to your WordPress dashboard.
- Navigate to Appearance > Custom Fonts (this menu appears once the plugin is active).
- Click on the Add New Font button to start uploading your custom font.
- Enter a clear, recognizable name for your font in the “Font Family Name” field, for example, “My Custom Font”. This is the name that will appear in Elementor later.
- Under the Local Fonts or Self-Hosted Fonts tab (the exact name may vary by plugin), click Choose File or Upload Files and select your font file(s) from your computer.
- The best font format to upload is .ttf (TrueType Font), but most plugins also support other formats such as .woff, .woff2, .svg, and .eot for better browser compatibility.
- You can upload multiple font files to include different font weights (like Regular, Bold, Italic). Some plugins allow you to add these variations for better control over typography.
- After uploading the font files and naming your font, click the Save Font or Publish button to complete the process.
- The uploaded custom font is now ready to be used in Elementor — it will appear in the font family dropdown wherever typography options are available.
Important Notes:
- If you encounter an upload error due to file type restrictions, consider contacting your host or enabling necessary permissions.
- Uploading multiple font formats ensures your fonts display correctly across all browsers.
- Plugins like “Custom Fonts” by Brainstorm Force and “Use Any Font” also automatically convert your files to optimized formats like WOFF2.
- Ensure that you own the font license or have permission to self-host the font files.
This step ensures your custom font is locally hosted, improving website loading speed and compliance with privacy regulations instead of relying on external font services.
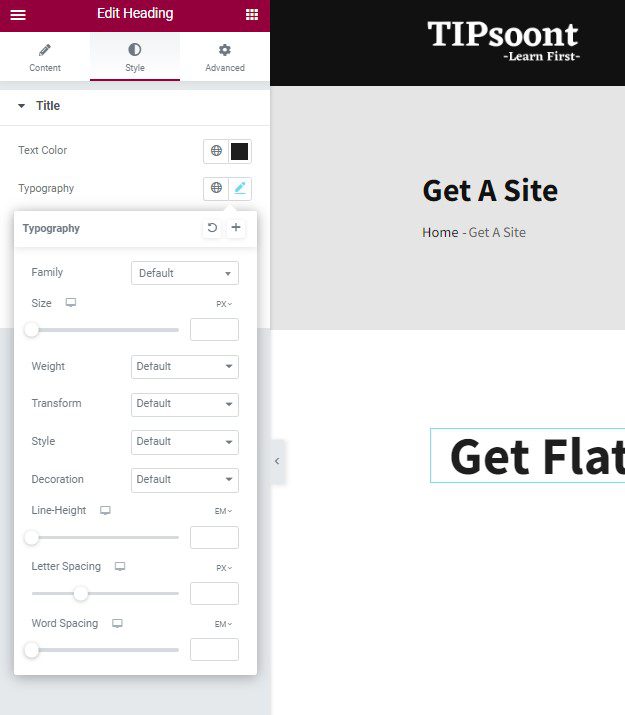
(Step 3): Add custom font in Elementor:
- Open the Elementor Editor:
- From your WordPress dashboard, navigate to the page or post where you want to apply the custom font.
- Click Edit with Elementor to launch the Elementor visual editor.
- Select the Widget to Customize:
- In the Elementor editor, select any widget that contains text you want to style, such as Heading, Text Editor, Button, or Nav Menu.
- Click on the widget to open its settings panel on the left sidebar.
- Access Typography Settings:
- In the widget’s settings panel, go to the Style tab.
- Under Style, find the Typography section where font properties such as font family, size, weight, line height, and letter spacing can be adjusted.
- Choose Your Custom Font:
- Click on the font family dropdown menu within Typography.
- Scroll through the list or type the name of your custom font (the name you gave when uploading the font in Step 2).
- Select your custom font from the list. It will now be applied to the selected widget’s text.
- Adjust Additional Styling:
- After selecting your custom font, adjust size, weight, style, and letter spacing as desired to fit your design.
- Elementor will instantly reflect the changes in the live preview.
- Apply Custom Fonts Sitewide (Optional):
- For global typography settings, go to Site Settings in Elementor (hamburger menu in the top left).
- Navigate to Typography > Body or Headings.
- Select your custom font to make it the default font for body text or headings across the entire site.
- Save and Preview:
- Once satisfied with the typography, click the Update button to save your changes.
- Preview the page to ensure the custom font displays correctly on the frontend.
Additional Tips:
- If your custom font does not appear in the dropdown, clear your site and browser cache or re-upload the fonts.
- Always check mobile and tablet views to ensure fonts render legibly at different screen sizes.
- Combining custom fonts with Elementor’s responsive typography features enhances design flexibility.
By following these steps, you can fully utilize your uploaded custom fonts in Elementor’s free version, enhancing your website’s branding and visual appeal uniquely and professionally.
Once you have installed and activated the plugin, you can use the appearance and custom fonts. A new page will appear where you will add the font name and font fallback. Moreover, add and upload different font formats you have downloaded from Google and wish to have in Elementor.
That’s it! Once you add the custom fonts in Elementor free using a plugin, you will get the same kind of options under the typography settings of Elementor. Just download the font from Google and then type the name of the font you want, and then add it to the list in Elementor for free.
Ready to Add Custom Fonts in Elementor Free:
Wrapping up the discussion with a note that yes, it is possible to add custom fonts in Elementor Free, but you have to install a plugin for it. The custom fonts and any other premium features you want to access can also be it using a plugin. And if this is something you are comfortable with, then you can go for it.
The key takeaways from today’s article are;
- Install and activate the plugin
- Download the Google fonts and unzip the file
- Access the plugin using the Appearance
- Add the name of the font you downloaded
- Upload the custom fonts you installed
- That’s it; you’re all done
- Repeat the process to add another font
Hope this guide remains helpful to you. If yes, remember to subscribe to our newsletter for further exquisite helping posts.
Till Next!
Recommendation: Edit the Footer in WordPress Using Elementor.
FAQs
Can I add custom fonts in Elementor Free without Elementor Pro?
Yes, you can add custom fonts in the free version of Elementor by using third-party WordPress plugins like “Custom Fonts” or “Use Any Font” to upload and host your own font files locally.
Which font file formats can I upload using the Custom Fonts plugin?
Which font file formats can I upload using the Custom Fonts plugin?
Which font file formats can I upload using the Custom Fonts plugin?
Yes. After uploading custom fonts and selecting them in Elementor, clear your website cache and browser cache to ensure the fonts load properly on the frontend
Can I use Google Fonts with the Custom Fonts plugin?
Yes. Some plugins allow you to host Google Fonts locally on your server for faster loading and privacy compliance while selecting them easily inside Elementor.
Will uploading custom fonts slow down my website?
Hosting fonts locally using a plugin can actually improve speed by reducing external requests compared to loading fonts from third-party servers. Always optimize font files for size to maintain good performance.

Do Subscribe the Newsletter and Push Notification Because we'll share premium knowledge about web here for free.
- Best Visual CSS Live Editor Plugins for WordPress (2025 Update) - September 9, 2025
- Benefits Of Improving Your Web Design (2025 Updated Guide) - September 9, 2025
- How to Add Custom Fonts in Elementor Free | 3 Step Guide Using a Plugin|(2025 update) - September 8, 2025


2 Comments