Have you ever seen a website where you saw different font sizes in one text? For example, a line with multiple text sizes where one or two words are bigger than the rest of the text seems good. How can you add different font sizes in one text using elementor or CSS?
Well, the process is straightforward. With the help of a “span” element, you can customize the text as you want. Not only the font size, you can also customize it more using different styling, colors, or text-decoration features.
So, in today’s guide, we will show how you can create different font sizes in one text using elementor or CSS. Without further ado, let’s dive deeper into it.
Why Customize Font Sizes in a Single Text Block?
One excellent method to increase the impact of your design is to change the font sizes inside a single text block. It enables you to:
- Highlight Important Words or Phrases: Emphasize crucial details, like calls to action (CTAs).
- Boost Branding: Reflect your brand identity with distinctive typographic styles.
- Provide Visual Interest: Give headlines and content sections a creative touch.
For example:
- A headline like “Upgrade Your Skills – Learn from the Best!” looks more engaging when “Upgrade Your Skills” is larger than the rest.
- CTAs like “Click Here for Exclusive Deals” benefit from having “Click Here” stand out in size.
3. Prerequisites for different font sizes in one text
Before diving into the methods, ensure you have:
- Installed Elementor: The Pro or Free versions will function.
- Basic Elementor Knowledge: Know how to add and modify widgets in Elementor.
Elementor different font sizes in one text:
Let’s explore the step-by-step guide to create a different font size in one text using elementor.
1: Using Elementor’s Built-in Features (Without Classes)
- Open Elementor: Open the Elementor editor by navigating to the page you wish to modify.
- Drag and drop a “Text Editor” widget into your design to add a text widget.
- Highlight the Text: Select the section of text you wish to style by clicking inside the text editor.
- Customize Font Size: To alter the font size for the chosen text, use the options in the inline text editor.
- The widget’s Style tab’s typography options can be used to change the font size.
- For Additional Text, Repeat: As necessary, change the font size in other sections of the text.
Benefits and Drawbacks of This Approach
Advantages: Easy to understand and fast. No technological expertise is needed.
Cons: Limited ability to style many widgets or pages consistently.

1-Create Different Font Sizes in One Text Using Elementor Without Classes:
Step 1: Insert your text
Login to your WordPress dashboard and access it to Elementor.
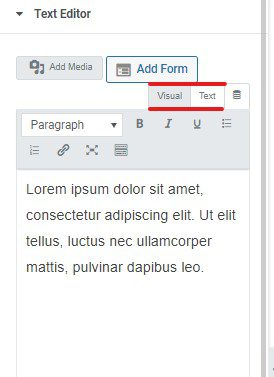
The first step you need to take is to insert your text in the elementor text editor widget. Once you type your text, don’t forget to shift from the “visual” to the “text” editor of elementor.
After this, you can go towards the second step of creating different font sizes in one text using elementor. Remember, the process will slightly differ if you use CSS classes, which we will discuss later in this guide. But let’s find out together how to create different font sizes in one text without defining classes.
Step 2: Adjust different font sizes in one text
Here is the second most important and final step towards customizing your text font size in one line. All you have to do is;
- Write the text and then shift to the text editor.
- Once done, select the text in a line you want to make bigger or smaller.
- Add <span> before the text you want to edit and again <span> where you want to close the text size.
- Within the span tag, you must mention the font size you need, either bigger or smaller.
- Repeat the process with the second part of the text you want to edit under the same line.
Remember, the span is a key tag to define different styling options and features under a single line. You can customize the font size, colour, and style using a span tag. Let’s understand the process with the help of an example.
Example of Creating Different Font Sizes in One Text Using Elementor Without Classes:
For example, you wrote the text and now want to adjust the font size, style, and colour in a single line. All you need to do is to write
<span style=”font-size: 50px; color: blue”>before the text you want to change and close the tag using <span>. Furthermore, if you wish to use one more style of text in the same line, repeat the process using the span tag but your desired keys.
Code Example
<p>My father has <span style="color:Green">green</span> eyes.</p>Here is an example of how you would do it exactly.
For a clear understanding <span style=”font-family; brush script MT: font-size: 50px: color green”>here is a text example. </span>
Note: if you don’t want to change the color and want to resize the text, then don’t use the color key as described above.
2- Create Different Font Sizes in One Text Using Elementor Using classes:
We recommend using this method. It’s a little bit the same but more efficient. We recommend using classes instead of the span mentioned above tags because you can reuse the class.
For example, you may have multiple text parts in the future and want to edit the sizes, fonts, or styling. In that case, you don’t have to reassign the span tags for each text, and you can easily reuse them using your text’s span tag and class.
In this way, returning to the custom class and applying the change is unnecessary once you save the settings.
So, to create different font sizes in one text using CSS classes, all you have to do is;
- Type the text you want and shift from visual editor to text.
- Once switched, now type the following code before the text you want to edit <span <p class=” fancy-text”>. Moreover, you can also change the color, font size, and more.
- Now, close the span tag using </span> and click to update.
- No changes will happen because you have not applied the custom class to the CSS. I navigated to the WP dashboard and installed and activated the custom CSS and Java code plugin.
- Furthermore, to edit the class, you must place the code there.
.feny-text {

font-family; Brush Script MT”:

Font-size: 40px:

color: red;

}
Now, click update and refresh the page. That’s it. You are good to go. Your text size, font size, and colours will be changed now.
Example CSS:
.custom-font-size span.small { font-size: 14px; }
.custom-font-size span.large { font-size: 24px; }
Apply the Styles: Use <span> tags in the text editor to style parts of your text. For example
<span class="small">Small Text</span> and <span class="large">Large Text</span>. Pros and Cons of This Method
- Pros:
- Consistent styling across your website.
- More flexible and scalable for complex designs.
- Cons:
- Requires basic CSS knowledge.
Tips for Optimizing Font Size Customizations

- Readability and Accessibility: Make sure font sizes are readable for all users by adhering to WCAG requirements. Steer clear of fonts that are too small or unreadable.
- Responsive Design: Modify font sizes for tablets and smartphones with Elementor’s responsive options.
- Consistency: To keep a neat and polished design, keep the number of font sizes to a minimum.
Ready to Make Text Bigger in Elementor?
So, now we have shared both methods to change font sizes in one text using elementor.
We recommend using the second method, but if you want to save yourself from the hassle of creating classes, return to the changes. You can use the first method.
Moreover, if you’re going to keep those changes one time, you can try the first method; otherwise, using classes would be worth it.
I hope you find this quick guide helpful. Don’t forget to write your queries in the comment section. We would love to be there.
Do you need assistance with special projects? For advice and special deals, join up for our newsletter, or get in touch with us for expert Elementor design services! We are offering Discounted Prices for website creation. Click Here to get it, and Don’t forget to leave a comment about the post. We are waiting for this.
- Best Visual CSS Live Editor Plugins for WordPress (2025 Update) - September 9, 2025
- Benefits Of Improving Your Web Design (2025 Updated Guide) - September 9, 2025
- How to Add Custom Fonts in Elementor Free | 3 Step Guide Using a Plugin|(2025 update) - September 8, 2025


