

Learn how to fix “The link you followed has expired” error in WordPress. Step-by-step methods to resolve upload issues and keep your site running smoothly.
Due to the unavailability of why it’s happening, things get overwhelmed and confused. Fair enough, right? No more worries, as we are here to resolve it with the
simplest possible methods. So, let’s get into it and find exciting and easy ways to resolve the issue.
Introduction
If you’re a WordPress user, chances are you’ve faced the dreaded “The link you followed has expired” error while uploading a theme or plugin. This issue often appears when you try to upload large files directly from your WordPress dashboard. Don’t worry—it’s one of the most common WordPress errors and is fairly easy to fix.In this guide, we’ll explain why this error occurs and share step-by-step solutions (2025 updated) to get your site back on track.
What are the Causes of the “The Link You Followed has Expired” Error?

Before digging into the solution, it’s good to know some basics of why it’s happening to you.
Most probably, you are facing this issue while uploading a file, plugin, or any theme. The reason behind this is pretty simple.
It’s because your file uploading size is limited; which means the file you want to upload is larger than usual. That’s why this error occurs and another reason for size limiting would be that the hosting provider has added some restrictions and limited the uploading size of your files.
Well, whatever the reason, we have a solution for you. So, let’s fix it.
How to Check the Size Limit?
You might wonder how you can check the size limit. So, let us quickly explain it to you
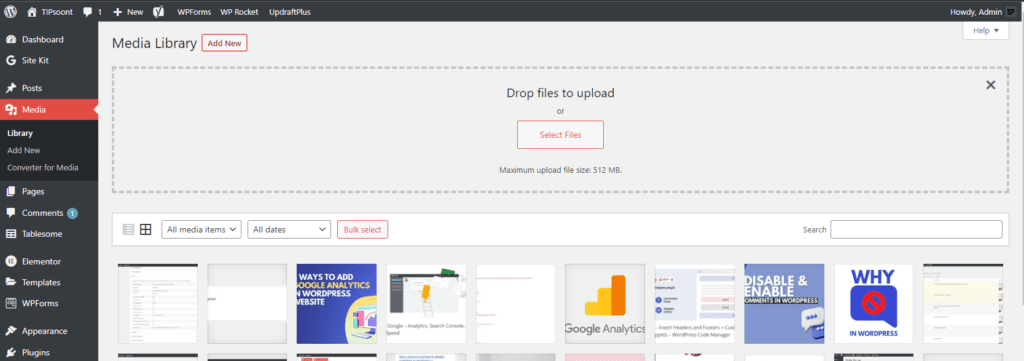
- To check the maximum size you can upload, you need to log in to your WordPress dashboard and then go to the media and the pages, and click Add New right there, you will get the maximum size limit. For Media mentioned In the picture And the Same for Pages.
- Other than this, you can also go to tools and then site health, next info, and follow by server option by logging in to your WordPress dashboard.
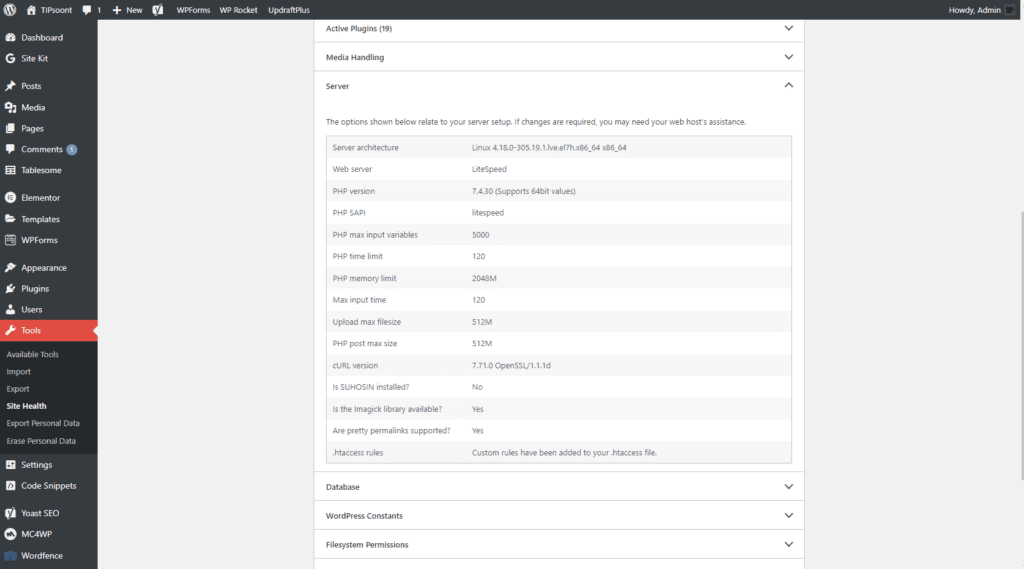
Through these two simple ways, you can easily find out what is the maximum size limit is and what you are uploading, and analyze the difference.
Fix the Error “The Link You Followed has Expired”:
To fix the error, you need to increase the size limit. That’s it! But there are different ways of doing it because one might work for you, another wouldn’t.
So, here we will state each possible solution for you to get the best results so that you won’t have to go anywhere searching for the answer.
Method # 1: Increase Limits via php.ini File
If your hosting gives you access to the php.ini file, add or update these values:
upload_max_filesize = 256M
post_max_size = 256M
max_execution_time = 300
memory_limit = 512M
Save changes, then restart your server if needed.
It’s a super easy method, and what makes it easy is the way to access it – which means you can go to your PHP file and can edit it but wait here; we have a disclaimer for you. Before digging into it, you should create a backup of your site, and it would be best if you use a child theme to protect your data as a child theme will automatically save all the changes you make.
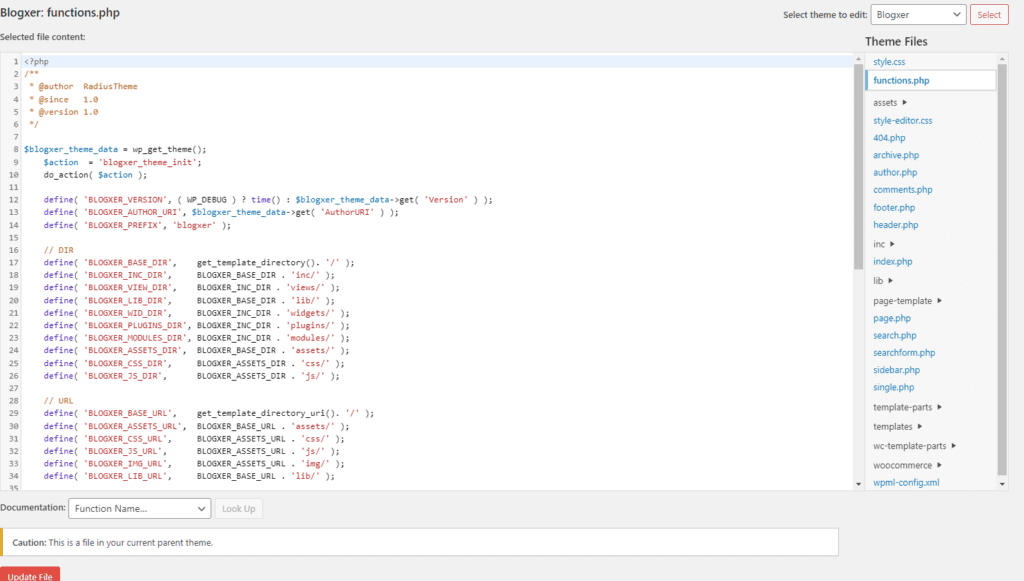
- To get access to the PHP file, all you need to do is just go to Appearance, then Theme File Editor.
- Here on the right sidebar, you will find the option of the functions. PHP file.
- Next, you need to copy this code.
@ini_set(‘upload_max_size’ , ‘64M’);
@ini_set(‘post_max_size’ , ‘64M’);
@ini_set(‘max_execution_time’ , ‘300’);- Paste this code into the function.php file and then update your file
- That’s it! It will resolve the error immediately.
Tip: make sure to change the “Upload_max_file_size”, “Post_max_file_size”, and “Max_execution_time” (should be long enough to upload the file) to get the necessary size you want to achieve.
We recommend using the second method, especially if you haven’t activated the child theme yet.
Method # 2: Modify .htaccess File
For Apache servers, edit your .htaccess file in the root directory and add:
php_value upload_max_filesize 256M
php_value post_max_size 256M
php_value max_execution_time 300
php_value memory_limit 512M
The safest and recommended method to solve the “the link you followed has expired” problem in WordPress is using your .htaccess file, and the reason is that you can get it done in two ways.
Via connecting to the server FTP or using your hosting account. Let’s discuss both of them one by one.
Using FTP:
- Find the .htaccess file located in the root folder of your site
- Once located, copy the code given below and paste it at the bottom of it
- Save the changes and upload the .htaccess file back to the root directory of your site.
- The issue should be resolved now.
php_value upload_max_filesize 64M
php_value post_max_size 64M
php_value max_execution_time 300
php_value max_input_time 300
Using CPanel:
You can also perform this method by using cPanel and for this, all you need to do is just
- Log in to the CPanel; if you cannot find the CPanel or don’t know much, then write CPanel at the end of your domain name and enter the login credentials that you used for it
- Find the options file manager here; click on it, and you will be navigated where you should be
- Here you will get the .htaccess option; right-click on it and choose edit
- After that, copy and paste the code at the end of the .htaccess file.
- Don’t forget to save, and it’s all done!
Method #3: Increase the size using the php.ini file
If both methods don’t work, there is no need to worry. Here is another method where you can get it done by just simply creating and uploading a PHP.ini file.
Some services would automatically have this file, but if you don’t have it, all you need to do is copy the code given below and paste it on any blank notepad and save it with the name of the php.ini file.
upload_max_filesize
= 64M
post_max_size = 64M
max_execution_time = 30
Now, go back to the server and upload the file you created. That’s it! This will resolve the issue, and the maximum file size will be upgraded.
Good to know: Use the same method as described above to access the CPanel and check whether any public HTML folder exists or not.
Method #4 Update functions.php File
You can also increase limits by adding this snippet to your theme’s functions.php file:
@ini_set( ‘upload_max_size’ , ‘256M’ );
@ini_set( ‘post_max_size’, ‘256M’);
@ini_set( ‘max_execution_time’, ‘300’ );
Method #5 Contact Your Hosting Provider
If you’re using shared hosting, sometimes you won’t have full access to modify PHP settings. In that case, contact your hosting provider and request an increase in:
Max Execution Time
Upload Max File Size
PHP Memory Limit
Method #6 Upload via FTP (Alternative Method)
If nothing works, bypass the WordPress dashboard by uploading your theme or plugin via FTP.
Activate from your WordPress dashboard.
Connect using FileZilla or cPanel File Manager.
Upload the unzipped theme to /wp-content/themes/.
Upload plugins to /wp-content/plugins/.
Pro Tips (2025 Update)
Use a Child Theme: If editing files like functions.php, use a child theme to prevent issues during updates.
Switch to Managed WordPress Hosting: Modern hosts like Kinsta, WP Engine, or SiteGround automatically handle resource limits.
Check Theme/Plugin Size: Some themes are bloated with demo content. Consider uploading lighter versions.
Final Thoughts:
The “The link you followed has expired” error in WordPress can be frustrating, but it’s not a permanent roadblock. By increasing your server limits or using FTP, you can quickly fix the issue and continue building your website.
In 2025, most modern hosting providers offer 1-click fixes or built-in settings to adjust PHP configurations, making this problem less common. However, knowing how to handle it manually ensures you’re never stuck.
Once you see this message, there is no need to panic, as an experienced person could also suffer from the same kind of issue. So, try all these 3; any of them could work for you.
But, if you have tried all these methods but are still facing this “the link you followed has expired” issue in WordPress, then you need to connect with your hosting provider because sometimes they don’t provide you with the opportunity to connect larger files, or they limit your file uploading size. That’s why you need to connect with them and ask for help.
Enjoying giving it a read? If yes, don’t forget to give it a like, it will boost us to create more content to help the community. For Your Suggestions, You can use the Contact us page too.
Till next, happy learning!
Can I fix this error without coding?
Yes. Simply ask your hosting provider to increase file size and memory limits.
What’s the default upload size limit in WordPress?
It varies by host—commonly between 2MB and 64MB.
Will editing functions.php break my theme?
If done incorrectly, yes. Always use a child theme or backup your site first.
Is FTP upload safe?
Yes, it’s often safer for large files since it bypasses server restrictions.
Which method is best in 2025?
Using Google Cloud / Managed WordPress Hosting or enabling higher limits via your hosting dashboard is the easiest and most reliable solution.

Do Subscribe the Newsletter and Push Notification Because we'll share premium knowledge about web here for free.
- Best Visual CSS Live Editor Plugins for WordPress (2025 Update) - September 9, 2025
- Benefits Of Improving Your Web Design (2025 Updated Guide) - September 9, 2025
- How to Add Custom Fonts in Elementor Free | 3 Step Guide Using a Plugin|(2025 update) - September 8, 2025


1 Comment