The default “out of stock” text in WooCommerce needs to be revolutionized. Apparently, nothing is wrong with this text, but think about when you visited a site to purchase a product but suddenly noticed a small text “out of stock.”
Have you got a good impression, or would you stay on the site?
No, nobody will; once they see that the product is no longer available to purchase. However, a slight change in the text, just as “temporarily out of stock” or “arriving soon,” will help you retain your customer’s attention, and the highest chances are he will keep visiting for the update.
This is how changing a little change “out of stock” text in WooCommerce can help you to maximize your sales.
How can you change the out-of-stock text, box color, or anything else in WooCommerce? If so, you are at the right place.
Customize “Out of Stock” Text in WooCommerce?

Customizing and changing the “out of stock” text in WooCommerce is straightforward. All you need is to add or edit a simple code.
Don’t worry. We will also state the code here. So, all you need is to stick with us until the end and walk through the process.
Step 1:
The very first step you need to take is to log in to your WordPress dashboard using your credentials (username and email). To make a change, get access to the theme editor from the appearance section of the left side panel.
Step 2:
A screen will appear where you will see the different theme file options on the right side. You must find the “function.php” file to open the theme text editor.
Step 3:
Now copy this code below and move on to the next step.
add_filter('woocommerce_get_availability_text', 'themeprefix_change_soldout', 10, 2 );

/**

* Change Sold Out Text to Something Else

*/

function themeprefix_change_soldout ( $text, $product) {

if ( !$product->is_in_stock() ) {

$text = '<div class="">Sold out.</div>';

}

return $text;

}
Step 4:
Scroll down to the function.php file, and at the end of the document, place the code mentioned above.
Step 5:
As you will see, a simple text of “sold out” has been added to the code. So, if you wish to customize this line, you need to change it slightly. For example, you can change this text from sold out to temporarily out of stock or anything else.
Step 6:
That’s it; you are all done.
Don’t forget to save and update to see the changes.
Bonus: The Alternate Plugin to Change Out of Stock Text in WooCommerce
If you are not comfortable making changes in the code snippet or are not a technical person, you are worried that it can harm your code file. So you don’t have to worry. You can also try a WordPress plugin as an alternative to change the out-of-stock text in WooCommerce.
Although various plugins are available, we recommend the “custom stock status” plugin. This plugin allows you to customize the message from your WooCommerce settings panel. With that, you can also add “dynamic data tags” to help your reader understand the expected date for a product to return to stock.
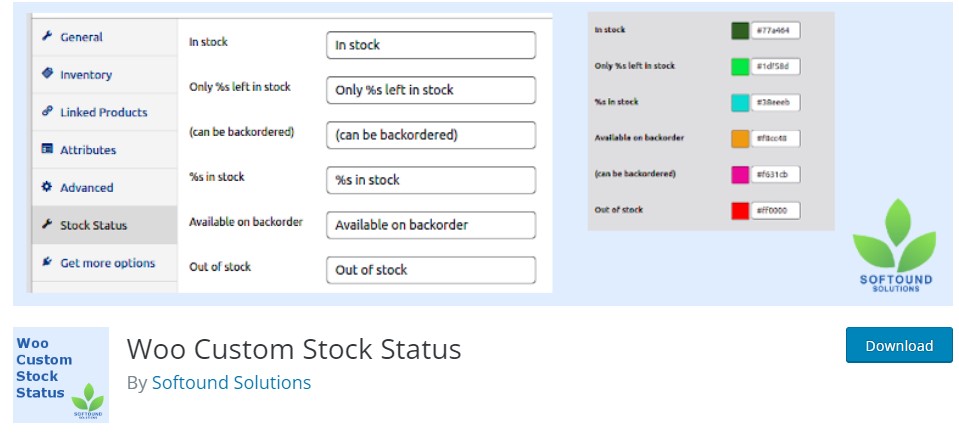
- Initiate the process by simply installing and activating the plugin.
- Once activated, go to the products page and click edit on the product you want to customize.
- You will see a wide variety of settings under the thing plugin, ranging from “in stock, % in stock, out of stock, and many others.”
- So, it means you have a lot more customization opportunities where you need to add your customized text to change the status of a product.
- Now, save the changes and refresh the page to see if the changes have been applied or not.
Final Words:
So, using other alternate words instead of “out of stock” will help you retain your customer and get more visibility. A comforting message is all you need to avoid customer annoyance.
All thanks to the PHP code that has made changing out-of-stock text in WooCommerce to any other easy. However, you can use the plugin mentioned above if you are uncomfortable doing it.
Do let us know in the comment section if the plugin worked for you.
you Should Read the Following Articles Till Next! For any Suggestions Visit the Contact Page of TIPsoont and the Comment Section too.


Do Subscribe the Newsletter and Push Notification Because we'll share premium knowledge about web here for free.
- How to Exclude a Website From Google Search | All You Need to Know - July 10, 2025
- 12 Free WordPress Themes With Demo Content in 2025 - July 10, 2025
- 10 Best Freelancing Websites for Beginners in Pakistan [2025 List] - July 10, 2025